3. デバイスとの統合
IoT デバイス/アクチュエーターとの統合には2つのタイプがあります:
- サウスバウンド統合
- ノースバウンド統合
センサー デバイスからブローカーに向かうデータ フローの場合はノースバウンド フローと呼ばれ、ブローカーからアクチュエータ デバイスに向かうデータ フローの場合はサウスバウンド フローと呼ばれます。
このチュートリアルでは、サウスバウンド フロー、つまり FogFlow がアクチュエータ デバイスを制御して環境を変更する方法に焦点を当てます。
3.1. サウスバウンド統合
3.1.1. アクチュエータ デバイスを FogFlow と統合
IoT デバイスには次の2つのタイプがあります:
- 環境データを収集し、それを何らかのアプリケーションにプッシュするセンサー。
- 環境に対して何らかのアクションを実行するアクチュエータ。
サウスバウンドが FIWARE のコンテキストで実際にどのように機能するかについての基本的な考え方を理解するには、この (this) チュートリアルを参照してください。
3.1.2. NGSI 対応デバイスとの統合
次の図は、FogFlow でサウスバウンド フローがどのように実行されるかを示しています。
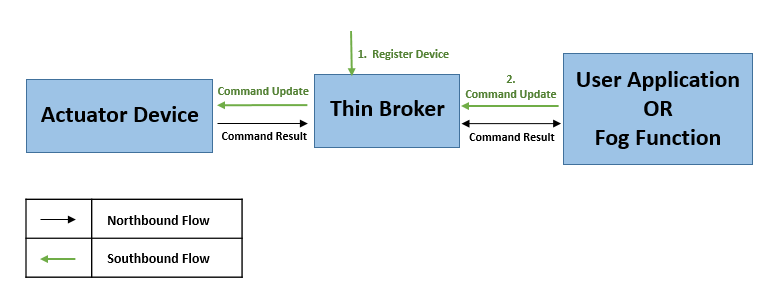
NGSI デバイスを使用するには、ユーザーはこの単純な Lamp デバイスを起動できます。このデバイスは、オン/オフコマンドを受信したときにランプのステータスを出力します。
Lamp デバイスを起動した後、次の curl リクエストを使用して FogFlow に Lamp デバイスを登録します。
curl -iX POST \
'http://<Thin_Broker_IP>:8070/NGSI9/registerContext' \
-H 'Content-Type: application/json' \
-H 'fiware-service: openiot' \
-H 'fiware-servicepath: /' \
-d '
{
        "contextRegistrations": [
            {
                "entities": [
                    {
                        "type": "Lamp",
                        "isPattern": "false",
                        "id": "Lamp.001"
                    }
                ],
                "attributes": [
                    {
                        "name": "on",
                        "type": "command"
                    },
                    {
                        "name": "off",
                        "type": "command"
                    }
                ],
                "providingApplication": "http://<Lamp_Host_IP>:8888"
            }
        ],
    "duration": "P1Y"
}'
以下は、Lamp (NGSI デバイス) で "on" コマンドを実行してオンにする要求です。このリクエストは Thin broker で発生することに注意してください。Thin broker は登録でプロバイダーを見つけ、このコマンド アップデートをそのプロバイダー、つまりデバイスに送信します。
curl -iX POST \
'http://<Thin_Broker_IP>:8070/ngsi10/updateContext' \
-H 'Content-Type: application/json' \
-H 'fiware-service: openiot' \
-H 'fiware-servicepath: /' \
-d '{
    "contextElements": [
    {
        "entityId": {
        "id": "Lamp.001",
        "type": "Lamp",
        "isPattern": false
        },
        "attributes": [
             {
                 "name": "on",
                 "type": "command",
                 "value": ""
             }
         ]
    }
    ],
    "updateAction": "UPDATE"
}'
このコマンド アップデートを送信すると、ユーザーはログで起動された Lamp デバイスのステータスを確認できます。"Lamp : on" になります。サポートされているもう1つのコマンドは、ユーザーがデバイスに送信できる "off" です。ユーザーは、コマンドの更新をノースバウンド方向に送信する独自のカスタマイズされたデバイスを持つことができます。
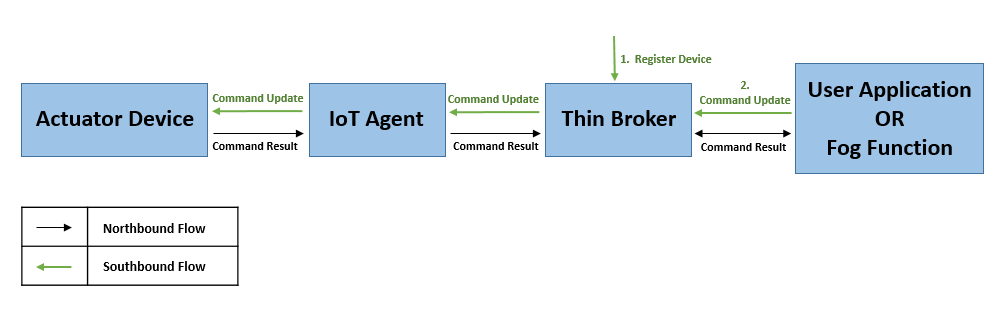
3.1.3. NGSI でサポートされていないデバイスとの統合
FIWARE が提供する IoT Agent は、非 NGSI デバイスと FogFlow の Thin Broker ーの間の双方向の仲介者として機能します。特定のプロトコルに基づくデバイスの場合、個別の IoT Agent があります。たとえば、MQTT ベースのデバイス用の IoT Agent for JSON 、超軽量デバイス用の IoT Agent for Ultralight などです。非 NGSI デバイスのサウスバウンド フローを次の図に示します。これは、デバイス プロトコル固有の IoT Agent を利用します。
3.1.4. Ultralight デバイスの使用
Ultralight アクチュエータ デバイスと FogFlow の統合を以下の例に示します。
Ultralight デバイスを使用してサウスバウンドで作業するには、IoT Agent for Ultralight および Ultralight デバイスが実行されている必要があります。このための docker-compose ファイルは、ここ (here) にあります。このファイルの "tutorial" サービスは、デバイス サービスを提供します。開始するには、ユーザーは環境変数に基づいてこのファイルを編集する必要があります。
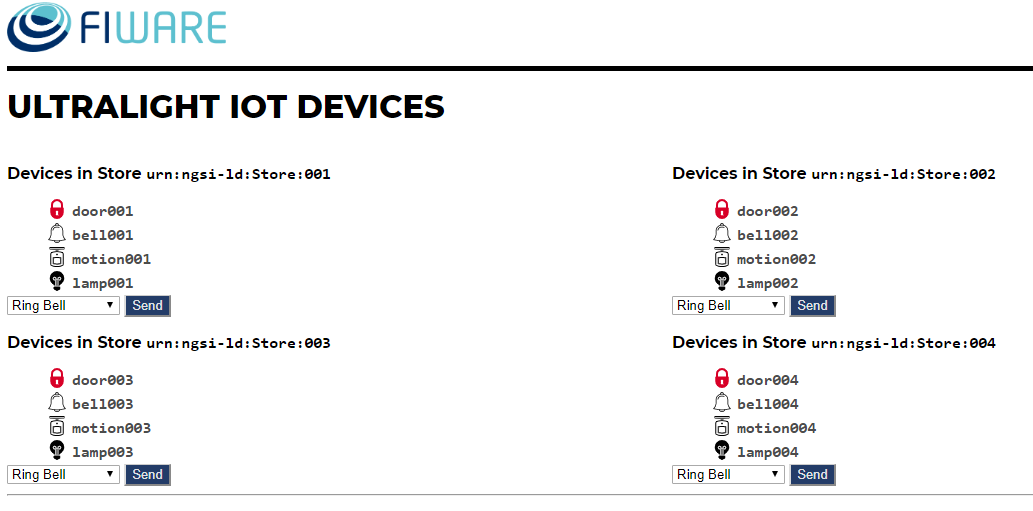
次の図は、http://tutorial_IP:3000/device/monitor にある IoT デバイス モニター ダッシュボードを示しています。
"lamp001" は "off" 状態であることに注意してください。この統合では、FogFlow を使用して Lamp デバイスを点灯します。
デバイスの登録: デバイスの登録は IoT Agent で行われ、デバイスが提供するデータを示します。以下は、IoT Agent でデバイスを作成または登録するための curl リクエストです。ここで、Lamp デバイスは、エンティティ "urn:ngsi-ld:Lamp:001" のコンテキスト プロバイダーであると想定されるID "lamp001" で登録されています。これに対応して、IoT Agent はデバイスを Thin broker に登録し、そのデバイスのエンティティを Thin broker 自体に作成します。
curl -iX POST \
'http://<IoT_Agent_IP>:4041/iot/devices' \
-H 'Content-Type: application/json' \
-H 'fiware-service: openiot' \
-H 'fiware-servicepath: /' \
-d '{
  "devices": [
    {
      "device_id": "lamp001",
      "entity_name": "urn:ngsi-ld:Lamp:001",
      "entity_type": "Lamp",
      "protocol": "Ultralight",
      "transport": "HTTP",
      "endpoint": "http://<Device_Host_IP>:3001/iot/lamp001",
      "commands": [
        {"name": "on","type": "command"},
        {"name": "off","type": "command"}
       ],
       "attributes": [
        {"object_id": "s", "name": "state", "type":"Text"},
        {"object_id": "l", "name": "luminosity", "type":"Integer"}
       ],
       "static_attributes": [
         {"name":"refStore", "type": "Relationship","value": "urn:ngsi-ld:Store:001"}
      ]
    }
  ]
}'
デバイスへのコマンドの送信: 外部アプリケーションまたはフォグ ファンクションは、デバイスのタイプに応じて、オン/オフ、ロック/ロック解除、オープン/クローズなどのコマンドをデバイスに送信することにより、アクチュエータ デバイスを制御できます。デバイスでサポートされているコマンドは、上記のデバイス登録を通じて Thin Broker に認識されます。
以下の curl リクエストは、"on" コマンドを lamp001 デバイスに送信します。
curl -iX POST \
'http://<Thin_Broker_IP>:8070/ngsi10/updateContext' \
-H 'Content-Type: application/json' \
-H 'fiware-service: openiot' \
-H 'fiware-servicepath: /' \
-d '{
    "contextElements": [
    {
        "entityId": {
        "id": "urn:ngsi-ld:Lamp:001",
        "type": "Lamp",
        "isPattern": false
        },
        "attributes": [
             {
                 "name": "on",
                 "type": "command",
                 "value": ""
             }
         ]
    }
    ],
    "updateAction": "UPDATE"
}'
上記のリクエストは、FogFlow エンティティの更新を示しています。これは、FIWARE Orion などの他のブローカーによってサポートされている形式とは少し異なります。そのため、FogFlow では以下のリクエストもサポートされています。
curl -iX POST \
'http://<Thin_Broker_IP>:8070/v1/updateContext' \
-H 'Content-Type: application/json' \
-H 'fiware-service: openiot' \
-H 'fiware-servicepath: /' \
-d '{
    "contextElements": [
        {
            "type": "Lamp",
            "isPattern": "false",
            "id": "urn:ngsi-ld:Lamp:001",
            "attributes": [
                {
                    "name": "on",
                    "type": "command",
                    "value": ""
                }
            ]
        }
    ],
    "updateAction": "UPDATE"
}'
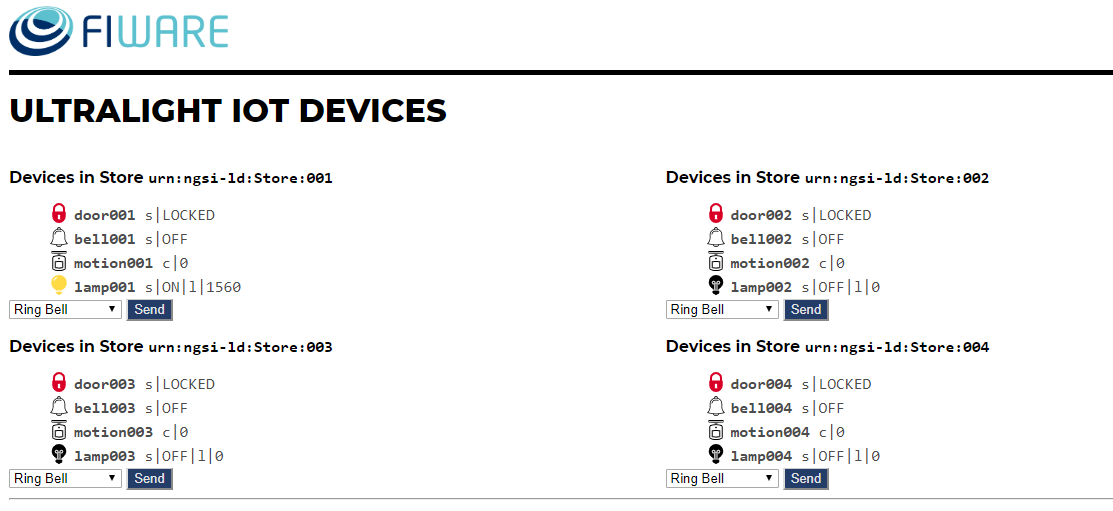
Lamp の状態を再度確認すると、下図のように点灯状態になります。
3.1.5. MQTT デバイスの使用
MQTT デバイスは、サブスクライブおよびパブリッシュ ストラテジーで機能する MQTT プロトコルで実行され、クライアントは MQTT ブローカーをパブリッシュおよびサブスクライブします。別のクライアントが MQTT ブローカーにデータを公開すると、すべてのサブスクライブしているクライアントに通知されます。
Mosquitto Broker は、MQTT デバイスのシミュレーションに使用されます。Mosquitto Broker は、トピックと呼ばれる一意に識別されたリソースでのデータの公開とサブスクリプションを可能にします。これらのトピックは、“/<apikey>/<device_id>/<topicSpecificPart>” の形式で定義されています。ユーザーは、Mosquitto がインストールされているホストで直接サブスクライブすることにより、これらのトピックの更新を追跡できます。
さらに進むための前提条件
- Mosquitto Broker をインストールします。
- MQTT ブローカーの場所を事前構成して IoT Agent を起動します。簡単にするために、docker-compose ファイルの IoT Agent for JSON の環境変数に以下を追加してから、docker-compose を実行します。
- IOTA_MQTT_HOST=<MQTT_Broker_Host_IP>
- IOTA_MQTT_PORT=1883   # Mosquitto Broker runs at port 1883 by default.
IoT Agent for JSON でノースバウンドとサウスバウンドの両方のデータ フローを許可するには、ユーザーはデバイス登録用に api-key も提供する必要があります。これにより、IoT Agent は api-key を使用してトピックをパブリッシュおよびサブスクライブできます。 。このため、追加のサービスプロビジョニング リクエストが IoT Agent に送信されます。FogFlow で MQTT デバイスを操作する手順を以下に示します。
次の curl リクエストを使用して、IoT Agent でサービスを作成します。
curl -iX POST \
  'http://<IoT_Agent_IP>:4041/iot/services' \
  -H 'Content-Type: application/json' \
  -H 'fiware-service: iot' \
  -H 'fiware-servicepath: /' \
  -d '{
"services": [
   {
     "apikey":      "FFNN1111",
     "entity_type": "Lamp",
     "resource":    "/iot/json"
   }
]
}'
次の curl リクエストを使用して、Lamp デバイスを登録します。
curl -X POST \
  http://<IoT_Agent_IP>:4041/iot/devices \
  -H 'content-type: application/json' \
  -H 'fiware-service: iot' \
  -H 'fiware-servicepath: /' \
  -d '{
  "devices": [
    {
      "device_id": "lamp001",
      "entity_name": "urn:ngsi-ld:Lamp:001",
      "entity_type": "Lamp",
      "protocol": "IoTA-JSON",
      "transport": "MQTT",
      "commands": [
        {"name": "on","type": "command"},
        {"name": "off","type": "command"}
       ],
       "attributes": [
        {"object_id": "s", "name": "state", "type":"Text"},
        {"object_id": "l", "name": "luminosity", "type":"Integer"}
       ],
       "static_attributes": [
         {"name":"refStore", "type": "Relationship","value": "urn:ngsi-ld:Store:001"}
       ]
    }
  ]
}'
Mosquitto トピックをサブスクライブ: サービスとデバイスが正常に作成されたら、別々の端末で Mosquitto Broker の次のトピックをサブスクライブして、これらのトピックで公開されているデータを追跡します:
mosquitto_sub -h <MQTT_Host_IP> -t "/FFNN1111/lamp001/attrs"
mosquitto_sub -h <MQTT_Host_IP> -t "/FFNN1111/lamp001/cmd"
Thin Broker へのデータの公開: このセクションでは、ノースバウンド トラフィックについて説明します。IoT Agent は、["/+/+/attrs/+","/+/+/attrs","/+/+/configuration/commands","/+/+/cmdexe"] などのデフォルト トピックをサブスクライブします。そのため、属性データを IoT Agent に送信するには、以下のコマンドを使用して MosquittoBroker のトピックに関するデータを公開する必要があります。
mosquitto_pub -h <MQTT_Host_IP> -t "/FFNN1111/lamp001/attrs" -m '{"luminosity":78, "state": "ok"}'
Mosquitto ブローカーはこの更新について IoT Agent に通知するため、データは ThinBroker でも更新されます。
更新されたデータは、下の図に示すように、サブスクライブされたトピック "/FFNN1111/lamp001/attrs" でも表示できます。

デバイスコマンドの実行: このセクションでは、サウスバウンド トラフィック フロー、つまり、デバイスでコマンドを実行する方法について説明します。このために、以下のコマンド updateContext リクエストを Thin Broker に送信します。Thin Broker は、このコマンド アップデートのプロバイダーを見つけて、UpdateContext 要求をそのプロバイダーに転送します。この場合、IoT Agent がプロバイダーです。IoT Agent は、リンクされている Mosquitto ブローカーの "/FFNN1111/lamp001/cmd" トピックでコマンドを公開します。
curl -iX POST \
'http://<Thin_Broker_IP>:8070/ngsi10/updateContext' \
-H 'Content-Type: application/json' \
-H 'fiware-service: iot' \
-H 'fiware-servicepath: /' \
-d '{
    "contextElements": [
    {
        "entityId": {
        "id": "urn:ngsi-ld:Lamp:001",
        "type": "Lamp",
        "isPattern": false
        },
        "attributes": [
             {
                 "name": "on",
                 "type": "command",
                 "value": ""
             }
         ]
    }
    ],
    "updateAction": "UPDATE"
}'
更新されたデータは、次の図に示すように、サブスクライブされたトピック "/FFNN1111/lamp001/cmd" で表示できます。これは、"on" コマンドが MQTT デバイスで正常に実行されたことを意味します。

ユーザーは、カスタマイズしたデバイスを使用して、コマンド結果を Thin Broker 側で公開できます。
3.1.6. RegisterContext の他の APIs
Registration を取得
以下は、FogFlow System 内の Thin Broker からデバイス登録を取得するための curl リクエストです。これにより、どのブローカーにそのデバイスに関するレジストレーション情報が含まれているかがわかります。
curl -iX GET \
'http://<Thin_Broker_IP>:8070/NGSI9/registration/Lamp001' \
-H 'fiware-service: openiot' \
-H 'fiware-servicepath: /'
上記の登録のデバイスの registration id は、FogFlow 内の "Lamp001.openiot.~" になります。
FIWARE ヘッダー (つまり、"fiware-service" と "fiware-servicepath") はリクエストでオプションであるため、ユーザーは次の方法で Thin Broker でレジストレーションを探すこともできます。結果は、検索対象に完全に依存します。
curl -iX GET \
'http://<Thin_Broker_IP>:8070/NGSI9/registration/Lamp001.openiot.~'
Registration を削除
次の curl リクエストは、FogFlow のデバイス レジストレーションを削除します。
curl -iX DELETE \
'http://<Thin_Broker_IP>:8070/NGSI9/registration/Lamp001' \
-H 'fiware-service: openiot' \
-H 'fiware-servicepath: /'
このリクエストにより、レジストレーション "Lamp001.openiot.~" が削除されます。FIWARE ヘッダー (つまり、"fiware-service" および "fiware-servicepath") は必須です。
3.2. ノースバウンド統合
3.2.1. IoT デバイスを FogFlow に接続
3.2.2. NGSI 対応デバイスを使用
デバイスが NGSI を介して FogFlow と通信できる場合、デバイスを FogFlow に接続するのは非常に簡単です。デバイスで実行するには、いくつかの小さなアプリケーションが必要です。たとえば、複数のセンサーまたはアクチュエーターが接続された Raspberry Pi などです。
次の例では、シミュレートされた PowerPanel デバイスを NGSI を介して FogFlow に接続する方法を示しています。このサンプルコードには、アプリケーションフォルダーの FogFlow code repository からもアクセスできます。
Node.js は、このサンプルコードを実行する必要があります。Node.js と npm をインストールしてください。
'use strict';

const NGSI = require('./ngsi/ngsiclient.js');
const fs = require('fs');

// read device profile from the configuration file
var args = process.argv.slice(2);
if(args.length != 1){
    console.log('please specify the device profile');
    return;
}

var cfgFile = args[0];
var profile = JSON.parse(
    fs.readFileSync(cfgFile)
);

var ngsi10client;
var timer;

// find out the nearby IoT Broker according to my location
var discovery = new NGSI.NGSI9Client(profile.discoveryURL)
discovery.findNearbyIoTBroker(profile.location, 1).then( function(brokers) {
    console.log('-------nearbybroker----------');
    console.log(brokers);
    console.log('------------end-----------');
    if(brokers && brokers.length > 0) {
        ngsi10client = new NGSI.NGSI10Client(brokers[0]);

        // generating data observations periodically
        timer = setInterval(function(){
            updateContext();
        }, 1000);

        // register my device profile by sending a device update
        registerDevice();
    }
}).catch(function(error) {
    console.log(error);
});

// register device with its device profile
function registerDevice()
{
    var ctxObj = {};
    ctxObj.entityId = {
        id: 'Device.' + profile.type + '.' + profile.id,
        type: profile.type,
        isPattern: false
    };

    ctxObj.attributes = {};

    var degree = Math.floor((Math.random() * 100) + 1);
    ctxObj.attributes.usage = {
        type: 'integer',
        value: degree
    };
    ctxObj.attributes.shop = {
        type: 'string',
        value: profile.id
    };
    ctxObj.attributes.iconURL = {
        type: 'string',
        value: profile.iconURL
    };

    ctxObj.metadata = {};

    ctxObj.metadata.location = {
        type: 'point',
        value: profile.location
    };

    ngsi10client.updateContext(ctxObj).then( function(data) {
        console.log(data);
    }).catch(function(error) {
        console.log('failed to update context');
    });
}

// update context for streams
function updateContext()
{
    var ctxObj = {};
    ctxObj.entityId = {
        id: 'Stream.' + profile.type + '.' + profile.id,
        type: profile.type,
        isPattern: false
    };

    ctxObj.attributes = {};

    var degree = Math.floor((Math.random() * 100) + 1);
    ctxObj.attributes.usage = {
        type: 'integer',
        value: degree
    };
    ctxObj.attributes.deviceID = {
        type: 'string',
        value: profile.type + '.' + profile.id
    };

    ctxObj.metadata = {};

    ctxObj.metadata.location = {
        type: 'point',
        value: profile.location
    };
    ctxObj.metadata.shop = {
        type: 'string',
        value: profile.id
    };

    ngsi10client.updateContext(ctxObj).then( function(data) {
        console.log(data);
    }).catch(function(error) {
        console.log('failed to update context');
    });
}

process.on('SIGINT', function()
{
    if(ngsi10client) {
        clearInterval(timer);

        // to delete the device
        var entity = {
            id: 'Device.' + profile.type + '.' + profile.id,
            type: 'Device',
            isPattern: false
        };
        ngsi10client.deleteContext(entity).then( function(data) {
            console.log(data);
        }).catch(function(error) {
            console.log('failed to delete context');
        });

        // to delete the stream
        var entity = {
            id: 'Stream.' + profile.type + '.' + profile.id,
            type: 'Stream',
            isPattern: false
        };
        ngsi10client.deleteContext(entity).then( function(data) {
            console.log(data);
        }).catch(function(error) {
            console.log('failed to delete context');
        });
    }
});
discoveryURL は profile1.json で変更する必要があります。
{
    "discoveryURL":"http://35.198.104.115:443/ngsi9",
    "location": {
        "latitude": 35.692221,
        "longitude": 139.709059
    },
    "iconURL": "/img/shop.png",
    "type": "PowerPanel",
    "id": "01"
}
次のようにインストールする必要があるパッケージ:
npm install
このサンプルコードを次のように実行します:
node powerpanel.js profile1.json
3.2.3. NGSI がサポートされていないデバイスの場合
NGSI がサポートされていない IoT デバイス (on-NGSI IoT Devices) を接続するために、FIWARE は MQTT、Ultralight などのさまざまなプロトコルに基づいて IoT デバイスと連携する IoT Agent を提供します。IoT Agent は NGSIv1 または NGSIv2 の両方で通信できますが、現在 FogFlow は NGSIv1 のみをサポートしています。そのため、ユーザーは NGSIv1 形式を使用するように IoT Agent を構成する必要があります。
ユーザーは、クラウド ノードの起動に使用される docker-compose ファイルを直接実行することで、FogFlow クラウド ノードで IoT Agent を実行できます。デフォルトでは、IoT Agent はすでに許可されています。ユーザーは、必要がない場合はオプト アウトできます。
エッジ ノード上の IoT Agent を実行するために、ユーザーは、Start Edge ファイルで関連するコマンドのコメントを解除することができます。
ロケーションベースの温度データを Thin Broker に送信する FIWARE IoT Agent for JSON の使用例を以下に示します。Iot Agent は、NGSI データをブローカーに送信するために次の3つの要求を必要とします。
- サービス プロビジョニング: サービス プロビジョニングまたはグループ プロビジョニングは、匿名デバイスの認証キー、オプションのコンテキスト ブローカー エンドポイントなどのデフォルトのコマンドまたは属性を設定するために IoT Agent によって使用されます。
以下は、IoT Agent でサービスを作成または登録するための curl リクエストです。
curl -iX POST \
  'http://<IoT_Agent_IP>:4041/iot/services' \
  -H 'Content-Type: application/json' \
  -H 'fiware-service: iot' \
  -H 'fiware-servicepath: /' \
  -d '{
"services": [
   {
     "apikey":      "FFNN1111",
     "entity_type": "Thing",
     "resource":    "/iot/json"
   }
]
}'
- デバイス プロビジョニング: デバイス プロビジョニングは、デバイスが IoT Agent に送信するデータとデータ属性を指定するために使用されます。
以下の curl リクエストは、エンティティ "Thing1111" のデータを IoT Agent に送信するデバイス ID "Device1111" を持つデバイスを登録するために使用されます。
curl -X POST \
  http://<IoT_Agent_IP>:4041/iot/devices \
  -H 'content-type: application/json' \
  -H 'fiware-service: iot' \
  -H 'fiware-servicepath: /' \
  -d '{
        "devices": [{
                "device_id": "Device1111",
                "entity_name": "Thing1111",
                "entity_type": "Thing",
                "attributes": [{
                        "object_id":"locationName",
                        "name": "locationName",
                        "type": "string"
                },{
                        "object_id": "locationId",
                        "name": "locationId",
                        "type": "string"
                },{
                        "object_id": "Temperature",
                        "name": "Temperature",
                        "type": "integer"
                }
                ]}]
}'
- センサーデータの更新: IoT Agent は、受信したデータをデバイス登録にマッピングし、それに対応する NGSI アップデートを作成します。IoT Agent はデバイスから非 NGSI 形式でデータを受信することに注意してください。
"Device1111" に代わって実際に "Thing1111" エンティティの更新を IoT Agent に送信する curl リクエストを以下に示します。
curl -X POST \
  'http://<IoT_Agent_IP>:7896/iot/json?i=Device1111&k=FFNN1111' \
  -H 'content-type: application/json' \
  -H 'fiware-service: iot' \
  -H 'fiware-servicepath: /' \
  -d '{
    "locationName":"Heidelberg",
    "locationId":"0011",
    "Temperature":20
}'
IoT Agent は、デバイスから更新を受信するとすぐに、Thin Broker に NGSIv1 UpdateContext 要求の形式でエンティティ データを更新するように要求します。